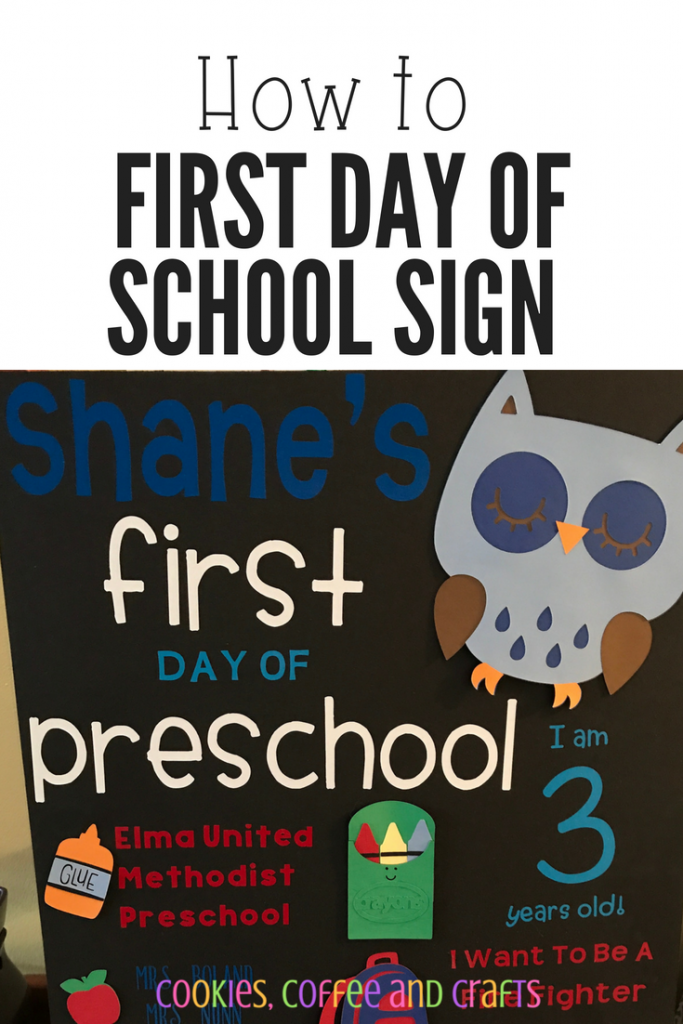
DIY First Day of School Sign
Note: As an Amazon Associate, I earn from qualifying purchases. If you click on a link from Amazon or another of my advertising affliates, I will earn a small commission at no additional cost to you. Please see my full disclosure policy here.
This was my son’s first year in preschool and I wanted to celebrate his first day of school and his last day of school. Preschool was a huge change for my son this year because he has been at home with me. Yes we went and did all kinds of things, but I was always there. It was emotional for both of us. I was a wreck all the way home that first day, crying my eyes out.
To celebrate this milestone, I created a “First Day of School Board.” This captured my son in that moment when he started preschool. We all laugh at “when I grow up I want to be a fire fighter” because he doesn’t talk about fire fighters, play fire fighter or even play with his fire trucks. That was my sons consistent answer over a couple of days so I added it the board. He’s also never mentioned it again either. Kids are so funny!
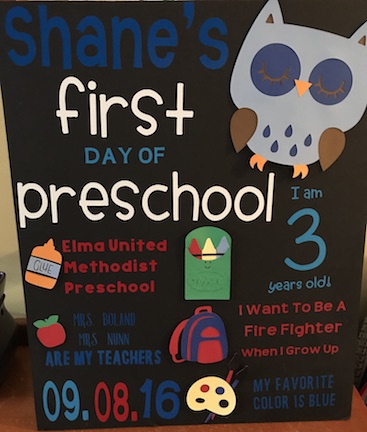
The first step in creating the board is deciding which information you would like to put on it. I do start asking the questions a couple days in advance because sometimes he just didn’t have an answer or told me “not right now.” Some answers are easy- teacher, school, age, date school starts.
Other Ideas to Put on the Board:
Age
Favorites
What I want to be when I grow Up
What do you want to learn
Favorite subject/class
Favorite Sport
Make sure the board reflects who your child is and what they like.
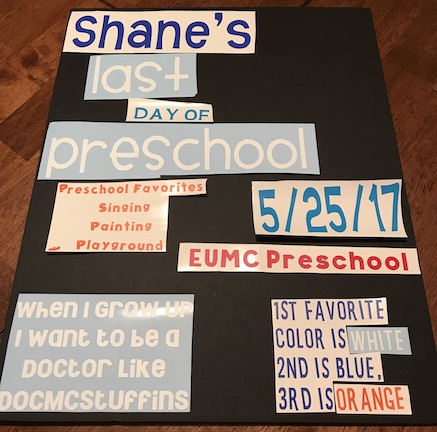
The steps are the same for the first and last day of school board. I used the backside of the first day of preschool board for the last day of preschool board. So it’s only 1 board for each school year.
Below are some affiliate links and I may make a commission for purchases made through the following links.
Materials:
Elmer’s Foam Board Multi-Pack, Black, 16×20 Inch, Pack of 3 (this is an amazing deal)
Cricut Vinyl Transfer Tape
Vinyl Ease 12″ x 12″ – 48 Sheets of Assorted Matte Colors of Removable Adhesive Backed Vinyl for Craft Cutters, Punches and Vinyl Sign Cutters – V0104
EK Tools Zig Memory System 2-Way Squeeze and Roll Glue Pen, New Package
Darice Core’dinations Value Pack Cardstock, 12 by 12-Inch, 100-Pack
Glue Dots Brand Adhesive Products Craft Roll – 1/2″, 200
Cricut Explore Air Wireless Cutting Machine
Cricut Tools Craft Basic Set
The next step is to measure the areas of your board so you know how big to make your design in Cricut Design Space. I create all the text information first and cut it in vinyl on my Cricut Explore.
Then I peel off the excess vinyl and weed the small pieces of vinyl out.
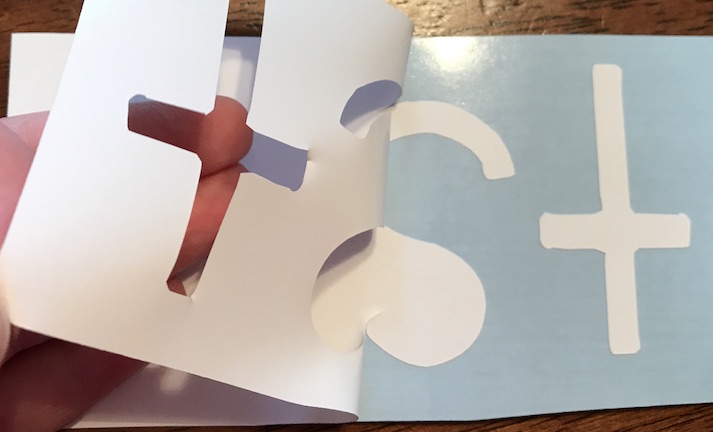
Then I lay all the vinyl out on the board of where I think I would like it to go.
Then I decide on the images I would like to add to the board. I do some of the images in vinyl and some in cardstock, I have a hard time layering vinyl. For the images, I choose them based on what my son said when I asked him questions. I added the frog and the rainbow because that’s the only time he has shared (all year) what he learned at school. Also the teddy bears are his prized possessions (he loves to take them to school). Then I create the images for the board in Cricut Design Space and cut the images on my Cricut Explore. Then I lay everything on the board to see if I like the layout and to make sure the board flows.
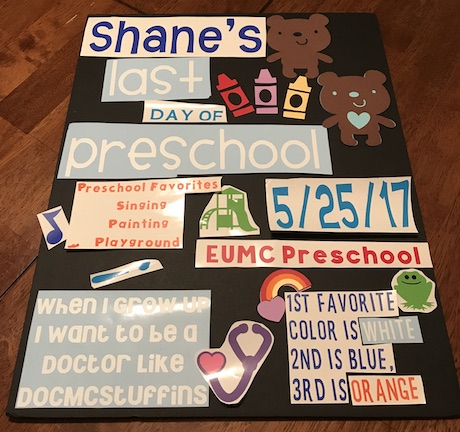
Next step is to complete the board and use transfer tape to add the vinyl to the board. Always start at the top and work your way to the bottom. Don’t move any pieces as you start to transfer, leave the board layout and just pick up one piece at a time to add to the board. I transfer the vinyl (text) and glue the images at the same time, for example I will transfer Shane’s, then, last, day of, and preschool and then I will glue the crayons and the teddy bears because it is all one section. Then for the next section I would do the “Preschool Favorites” then the playground, and then the date of the last day.
The last day of school board was easy because I reused text from the first day of school saved in Design Space, so I already had most of the board layout figured out from the first day of preschool board.
I can’t wait to see my son on his last day of preschool with the class picnic, singing the end of the year songs, and receiving a certificate. This board captures my son as he finishes his first year of preschool. I can’t wait to get a picture of him with the board (hopefully he will not be to silly). We are so proud of him and all he has accomplished this year!
Happy Crafting!